

So… This isn’t really a cake tutorial. Midterms are being mean to me, so I haven’t had time to make another one. Although…. I am working on a pain au chocolate that takes four days.
Anyway, I have some pictures of cakes that I made before I made a tumblr account and realized that I should take pictures of each of the steps. This is one of them.
I made this cake for one of my most favorite neighbors, since it was her birthday.
And I actually gave it to her on her birthday! No two week late procrastination! Which… was probably because it was Spring break.
What? Don’t judge. How else would I spend my Spring break?
Anyway, it was her birthday, and she wanted a Louis Vuitton purse cake, an Alma GM Louis Vuitton purse cake, to be exact, and I was more than happy to try to make it for her
But, before I list all of the absolutely lovely sugary bits that went into making it… Guess how much a real one costs? Go on. No? Well… how about 3,150$?
Yeah. That’s the face I made when I saw the price tag, too.
Frankly, I’d rather have the cake. At least it tastes good. SUGAR!
Moving on… The cake itself is the fabulous and wildly popular chocolate cake recipe by Ina Garten, Aunt Beatty’s Chocolate Cake. So good… I used Swiss Meringue buttercream for the icing, and the outside is marshmallow fondant! I thought about trying to add up the calories that would be in a piece of this, but… I decided I really didn’t want to know. Ignorance is bliss, right?
The first thing to be done is to make the decorations that need to dry before they’re applied, which would be the gumpaste parts.

I just used gumpaste and covered them with gold powder. Not shown in the picture, but necessary to making the cake is the gumpaste horseshoe shapes that need to be made ahead of time for the handles. Basically, it’s just two ropes of gumpaste curved into the right shape. It’s what makes the handles stand up.
After that, make the marshmallow fondant and let it sit overnight. The majority of it is going to be for the white base of the cake, but some of it needs to be held back for the tan parts of the cake.
Then, you need to bake the cake, and I used double the recipe, I think… or triple. It was a lot of cake. It’s better to bake them in square or rectangular cake pans, too.
Next, with a ruler, or by eye, measure the dimensions of the cake, and try to cut rectangles of the cake that roughly follow the measurements. Stack them with icing in between, and then smooth out the sides, cutting off excess cake. The shape is really just a really long, slightly rounded triangle, which, sadly, you can’t really see in any of the pictures that I took, but just look online. There are tons of reference pictures.
For stability, stick two skewers right down through the top of the cake, and make sure that they’re a good inch shorter than the cake, because the cake is going to settle, and then there will be wooden skewers sticking out and… it’s just not good. Trust me, I speak from experience.
Then, I frosted the outside and put it in the fridge to chill while I rolled out my marshmallow fondant. Make sure that it’s big enough (super important), and then drape it over the top, smoothing out any fold, and pinching it together on the two ends to form the seams. Trim off any extra.
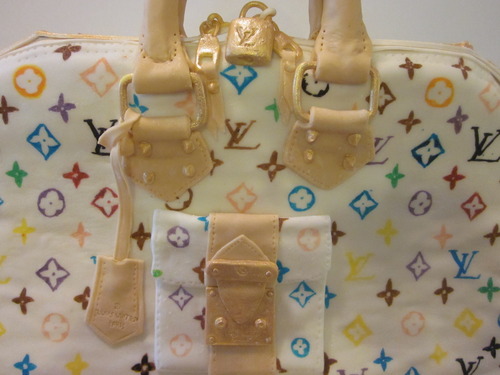
Time for decorations! The zipper is just a piece of gumpaste with a tool run over it to make it look like a zipper. The handles are a little more difficult, because the gumpaste centers need to be wrapped in the tan marshmallow fondant, and then that piece connected to the golden gumpaste rings, which is in turn connected to a cut out of the tan again. Right next to the zipper, on either side, make a faint impression all along it. Slightly dampen the back of the tan cut out that hangs off of the golden square ring. Settle the ends one of the fondant covered gumpaste handles onto the impression/ridge on the side of the zipper, and then press the damp cut out onto the cake. Repeat the same process for the other side while not letting go of the first one but keeping the handle upright. It really, really helps if you have someone to hold the first one while the second one is getting down. Then, press the handles together lightly, balancing them, and tie them together with a piece of string to let them set up.
Everything else is fairly simple and can be seem in the photographs. Make the strip across the bottom and add the studs all over the purse dusting them with gold, fold a piece of white fondant for the little pocket and the tan strip that goes across it, cut out a piece of the tan for the little tag. Then, apply the hardened gumpaste pieces with a bit of water. I poked little holes in the tan to simulate stitching, too.
Finally… begin the laborious task of drawing the pattern on with food-grade markers. It only took me, you know, a couple of hours? No more than four and probably closer to three, but I am pretty slow. In the beginning, I used a template, just to show me the spacing of the pattern, but then I just did it free-hand.
FINISHED! It came out looking like this.
After that, make the marshmallow fondant and let it sit overnight. The majority of it is going to be for the white base of the cake, but some of it needs to be held back for the tan parts of the cake.
Then, you need to bake the cake, and I used double the recipe, I think… or triple. It was a lot of cake. It’s better to bake them in square or rectangular cake pans, too.
Next, with a ruler, or by eye, measure the dimensions of the cake, and try to cut rectangles of the cake that roughly follow the measurements. Stack them with icing in between, and then smooth out the sides, cutting off excess cake. The shape is really just a really long, slightly rounded triangle, which, sadly, you can’t really see in any of the pictures that I took, but just look online. There are tons of reference pictures.
For stability, stick two skewers right down through the top of the cake, and make sure that they’re a good inch shorter than the cake, because the cake is going to settle, and then there will be wooden skewers sticking out and… it’s just not good. Trust me, I speak from experience.
Then, I frosted the outside and put it in the fridge to chill while I rolled out my marshmallow fondant. Make sure that it’s big enough (super important), and then drape it over the top, smoothing out any fold, and pinching it together on the two ends to form the seams. Trim off any extra.
Time for decorations! The zipper is just a piece of gumpaste with a tool run over it to make it look like a zipper. The handles are a little more difficult, because the gumpaste centers need to be wrapped in the tan marshmallow fondant, and then that piece connected to the golden gumpaste rings, which is in turn connected to a cut out of the tan again. Right next to the zipper, on either side, make a faint impression all along it. Slightly dampen the back of the tan cut out that hangs off of the golden square ring. Settle the ends one of the fondant covered gumpaste handles onto the impression/ridge on the side of the zipper, and then press the damp cut out onto the cake. Repeat the same process for the other side while not letting go of the first one but keeping the handle upright. It really, really helps if you have someone to hold the first one while the second one is getting down. Then, press the handles together lightly, balancing them, and tie them together with a piece of string to let them set up.
Everything else is fairly simple and can be seem in the photographs. Make the strip across the bottom and add the studs all over the purse dusting them with gold, fold a piece of white fondant for the little pocket and the tan strip that goes across it, cut out a piece of the tan for the little tag. Then, apply the hardened gumpaste pieces with a bit of water. I poked little holes in the tan to simulate stitching, too.
Finally… begin the laborious task of drawing the pattern on with food-grade markers. It only took me, you know, a couple of hours? No more than four and probably closer to three, but I am pretty slow. In the beginning, I used a template, just to show me the spacing of the pattern, but then I just did it free-hand.
FINISHED! It came out looking like this.

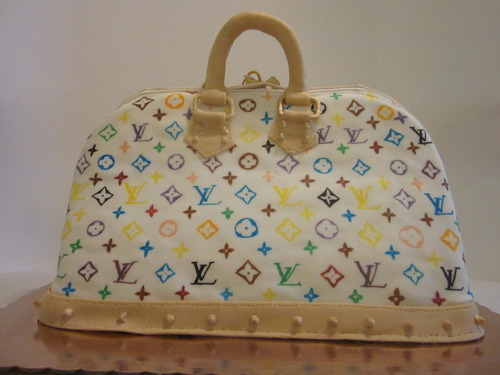
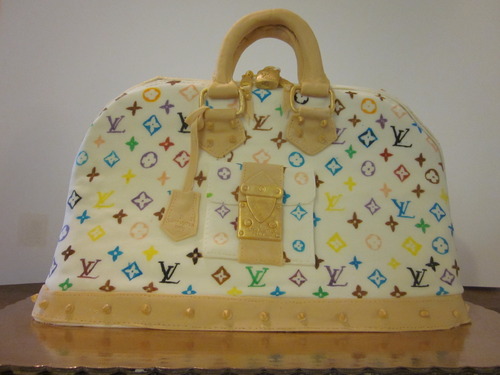
Ta da! I’m rather proud of this cake, and, more importantly, the wonderful woman for who it was for? She loved it. Yays!
 RSS Feed